
Duckponics鴨耕共生
Patrick improves our mid-level aquaponics system
When I first came to Windward, Duckponics was a project I was immediately interested in. Coming with a background in irrigation and a long time love of pond works and hobby aquariums, I was excited for this was a chance to explore this area at a level I had only dreamed of. Much was in place already, but much was still left to do, and still more was yet unknown. Before I jumped into Duckponics too deep though, I had an opportunity to work with a smaller system already in place here, Barrelponics.
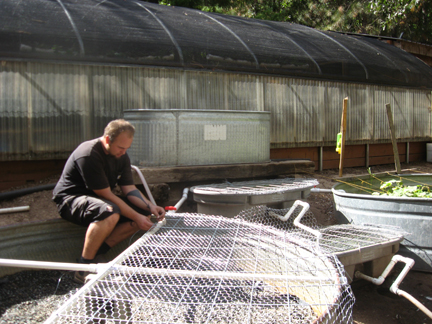 |
| Patrick adds chicken wire to the cattle panel covers |
Barrelponics is a study in theory and mechanics. Many projects here start out this way, small. It's a great way to test an idea, a mock up if you will, before making any larger commitments. With anything you do, especially in the presence of unknowns, there will be mistakes. Mistakes, loss, fails, whatever you want to call them, are not necessarily bad if you choose to look at them in the right light. We learn so much from our mistakes and the process of correcting them. This is why starting small works so well for us, small projects = small mistakes = small loss. Once the problems are worked out at the small level we are ready to move on to the next level. So, after getting my hands dirty with barrelponics making some minor changes and additions I had the understanding necessary to more confidently move over to duckponics.
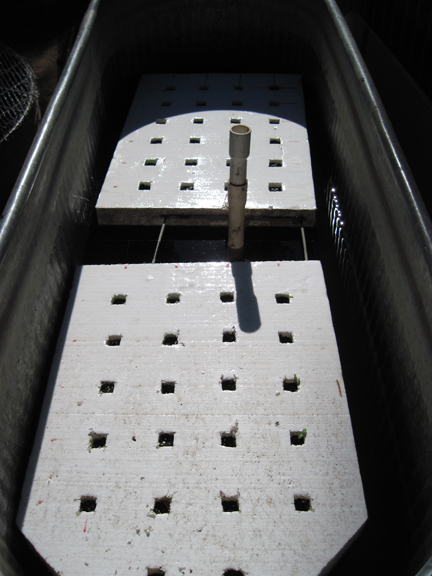 |
| the combination grow raft and float |
After all this was done effectively (which was much easier after my experiences with barrelponics), there was a whole new gambit of unforeseen challenges to address. Such as, with this abundance of vegetation right there in the open, it invited many local critters to our hopeful feast: the ever present ground squirrels wanted the cucumbers; the yellow jackets wanted the water; and even our own ducks couldn't wait for us to harvest the duckweed for them and were raiding the tanks prematurely. So, it was obvious that protective covers were a must. We made these out of cattle panels and chicken wire and they have proven pretty effective so far.
October 21:
A few words on water flow challenges
 |
| the inlet to the flood tank |
This works fine, however, there is a point when the upper float applies enough pressure to the hatch chain to begin opening the rubber flapper door that releases the water to the various vegetable grow tanks. That door is a two inch hole that is diverted to two different pipelines that have ball valve that allows us to control the rate that water flows from the holding tank into the grow tank. If those ball valves are fully open, enough water escapes through the lower port so that the water level in the flood tank never reaches a level where the upper float completely opens the hatch door for the duration of the flood.
So, after much tinkering, we were able to close the ball valves just enough to hold back the escaping water long enough for the pump to trigger the full open flood while still having the ball valves open enough to deliver enough pressure to power the water delivery tubes for the grow beds. If it isn't one thing it's another!
October 22:
Water distribution
So now that the water is flowing and everything seems to be going fine, we need to look at how the plants receive that water. First of all, it is important to know that in any hydroponic system, it is the water that delivers the nutrients the plants need, not the soil. In most hydroponic systems a lot of money is invested in purchasing additives and nutrients for the water, and even more is spent on purchasing special neutral growing mediums such as Hydroton or Vermiculite. That is why we use water from the duck pond, the ducks fertilize the water for free, and in the process the plants filter the water and return cleaner water for the ducks' enjoyment.
 |
| ball valve flow adjuster |
Also, we use pea gravel as our growth medium as this is more cost effective, more natural, and supports the nitrifying bacteria needed for the necessary biological process of converting ammonia to nitrite and then to nitrate. Pea gravel also makes a great low grade filter.
While we were getting some of the other parts in place and working properly, we were delivering the water to the grow beds as a direct flood to the edge of the bed, you will probably see this in some of the early photos. But as I've said before, the long term vision was for something more sophisticated than this and through experimenting with the setup, we more fully realized the benefits of a "prettier" delivery. Basically, with the pea gravel acting as some what of a filter, if all the water is dumped on one side of the grow tank the nutrients may be unevenly distributed throughout the tank resulting in uneven plant growth.
 |
| watering system in action |
Now came the tricky part. From previous observation, we noticed that with sufficient pressure these holes in these tubes acted like spray nozzles, damaging any small plants that were in their line of delivery. The solution we came up with was to drill the holes on either side of the top of the pipes so the water shoots up at an angle and then adjusted the pressure to make sure none of the water flow was directed outside the tank. By using an upward arc in the water we use gravity to pull the water back down to the plants at the speed of rain which every plant is essentially used to.
October 23:
Protecting our pump
It was stated earlier that at a certain point this summer there was a significant increase to our duck flock and this had some unforeseen effects on the pump for duckponics. It was all those baby feathers that eventually clogged up the turbine in the pump and caused it to burn out. We don't want to get rid of the ducks, so what do we do about the feathers?
Well, we cleaned out the duck pond as best as time would allow since other projects (such as watering the main garden and keeping the thriving cucumbers and mint alive in the grow beds of duckponics) depend on the functioning of the duck pond. However, no matter how often we may endeavor to go through a full scale pond flush, the feathers as well as other debris still come back to haunt us, quickly.
We don't know yet if it is the total solution, but we think it is part of it. The box filter. Basically we took an old plastic milk crate and cut mesh screen pieces from a satellite dish to fit on all six sides. We wired them on, cut a custom hole to receive the pump, and attached the two together before resubmerging the new pump.
I don't know if you've seen the screen mesh that old satellite dishes are covered with but the holes are pretty small. Still large enough for plenty of water to move through but just small enough to keep the feathers from getting to the pump. It still requires some checking in on but we would rather clean off the box filter every couple of weeks than replace the pump just as often.
Also on the drawing board is a possible cyclone settling tank that would allow the silt to settle out before being delivered to the flood tank.
留言